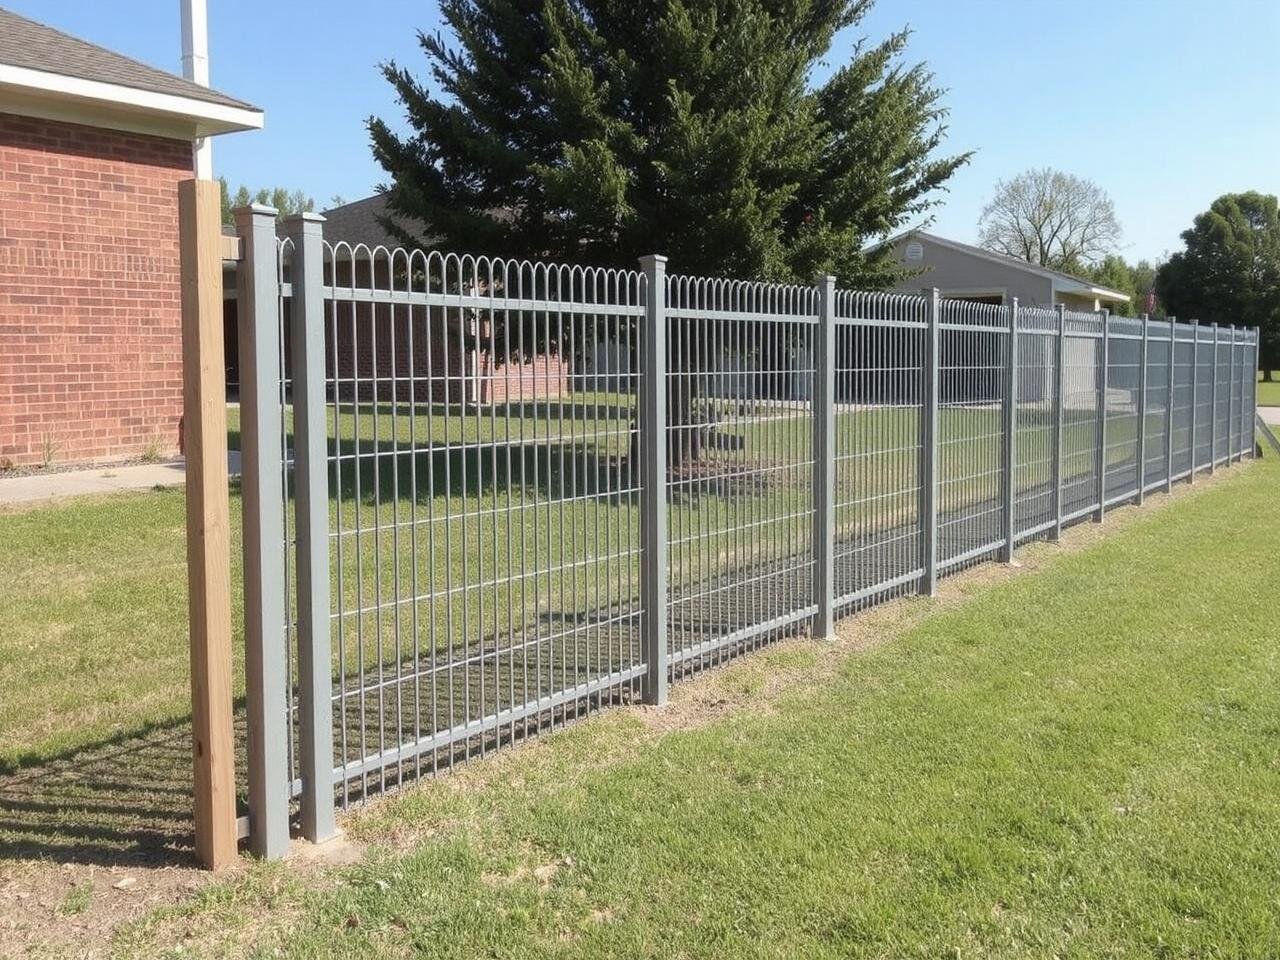
The Delta V-Tech fences are among a variety of advanced fencing solutions for security purposes.
Be it protection for a residential area or securing an industrial complex, such fences provide matchless durability and safety features.
However, for being able to derive maximum efficiency from your Delta V-Tech fence, its installation must be done with strict adherence to instructions.
Improper installation can only lead to the reduction of integrity in the fence by shortening its lifespan and its efficiency in securing your property.
In this article, we will give a step-by-step guide on how to install a Delta V-Tech fence properly. Along with all the tools and material you may want to know, common mistakes to avoid, and tips for an easy installation process.
By the end of this guide, you will be equipped with the Delta V-Tech Fence Installation Instructions.
Must Also Read: 12+ Essential Fiber Optic Color Codes You Must Know for Perfect Installations
What is a Delta V-Tech Fence?
Delta V-Tech fences are manufactured to provide high-security levels with an added touch of aesthetic appeal. Manufactured from hard metals like steel or aluminum, they are usually coated with rust-resistant finishes, hence suitable for all kinds of environments.
Whether residential property or a commercial site, Delta V-Tech Fences have been built to resist the elements and any attempts at tampering or breach.
Another amazing thing about Delta V-Tech fencing is that it’s modular. This provides ease of customization and adaptability to varied terrains or property layout.
The panels can be arranged in such a fashion to achieve a particular height; besides, features providing added security may be incorporated: spiky electric or high-security areas.
Delta V-Tech Fence Installation Instructions (Step-by-Step Solutions)
Step 1: Get Your Materials Ready
Primarily, get all the materials and tools that may be required during the installation process in one place for easy access. This will facilitate a smoother and quicker process of installation.
Look at your list of materials that include, but are not limited to:
- Delta V-Tech fence panels
- Fence posts
- Mounting brackets
- Concrete mix or gravel
- Screws, bolts, and nuts
- Safety gear
Step 2: Installing the Fence Posts
Location marking of the posts: Mark from earlier measurements and markings where each post will occupy. The usual spacing is 6 to 8 feet, although this may change according to the design of your Delta V-Tech fence.
Dig post holes: Begin to dig holes for each of the posts with the post hole digger. Each one should be deep enough to support the posts satisfactorily. Generally, this is usually about one-third of the height of the post.
Setting the Posts: Place each post in its respective hole. Using a level, ensure it is perfectly vertical. To stabilize it even further, you may want to pour concrete in the hole. If you chose gravel, simply pour it around the post, packing it tight.
Allow the Concrete to Cure: The greater number of concrete mixes takes a span of 24-48 hours depending on the type being used. This is done to allow anchoring of the posts.
Step 3: Attach Fence Panels
Take out the Panels: Take out your Delta V-Tech fence panels and place them beside the posts. You should be able to see how they’ll look upon attachment.
- Bracket Installation: Attach the mounting brackets to the fence posts using a power drill. Ensure they are snug, level, and at your intended height.
- Attach Panels: Lift the fence panels into position and screw or bolt them onto the brackets. Each should be just level and aligned with its neighbors for continuity in appearance.
- Doing This Repeatedly: Repeat this for all panels down the line of the fence, keeping a regular pattern and spacing throughout.
Step 4: Installing a Gate
If your Delta V-Tech fence design requires or includes the installation of any gates, the process may be done as follows:
Establishing Where the Gate Will Go: Deciding which part of your fence you want to put the gate.
Set the gate posts just like setting major fence posts, but dig the holes a little deeper and more solid than ordinary posts because it would carry more weight and would be subjected to more use.
Installing the Hardware on the Gate: Avail yourself of the manufacturer’s instructions in installing the hinges and the latch. The gate must swing open and closed with ease.
Test the Gate: Before considering the installation complete, test the gate for opening and closing. If there is any need for adjustment, adjust the hinges for proper alignment.
Step 5: Finishing Touches
Panel Securing: Go back through the fence to double-check that all screws and bolts are tightened and that the panels are securely fastened to the posts.
At times, Cleaning Up: Clean up your yard of all the leftover material and refuse from the installation site.
Optional: Painting or Treatment You may want to paint or apply a protective treatment to protect it and make it look even better.
Final Inspection Check the entire fence, making sure everything is secure and in its proper place.
Tools and Materials Needed for Delta V-Tech Fence Installation
Having the right tools with you at the start of your project to install the Delta V-Tech fences will surely enhance your working speed and the quality of your overall project.
Following is the list of major tools which you would be required to have:
- Power Drill: For creating holes in the posts of the fence to embed screws.
- Measuring Tape: For measuring your property line and also the fence panels.
- Level: For making sure your posts and panels go up straight.
- Post Hole Digger: To dig holes for fence posts deep.
- Concrete Mix: If you use concrete to set your posts with.
- Screwdriver Set: To screw screws and put brackets together.
- Wrench: Because you will have a few bolts and nuts to secure.
- Safety Gear: Including gloves and safety glasses for protecting oneself during the installation.
Optional Tools for Faster and Easier Installation
While the above-mentioned are essential, some additional tools will make life easier during installation:
- Power Saw: In case fence panels or posts need to be cut to size.
- Electric Mixer: This makes one enable mixing concrete in a quick and fast manner.
- Hammer: Keeping the stakes or nails while setting up.
- Trowel: Smoothing the concrete around the base of the fence post.
Having these extra tools on hand will ease the installation process and get it done sooner.
Materials Needed
In addition to the tools, you will also need to have some specific materials to be able to complete the Delta V-Tech fence installation instruction:
- Delta V-Tech Fence Panels: Order panels according to your height and design requirement.
- Posts: Compatible with the type of fence panel you intend to use; generally, they are manufactured from the same durable material.
- Mounting Brackets: These are for mounting the panels onto the posts.
- Hardware: Particular screws, bolts, and nuts to your system.
- Concrete or gravel: Set the posts into the ground for support.
- Gate Kit: Check with your design if it has all the included elements of a gate.
It is better to purchase supplies from trusted suppliers to guarantee their compatibility and quality. The materials for Delta V-Tech are available at professional fencing sellers and online stores.
Maintenance Tips for Delta V-Tech Fences
Your Delta V-Tech fence will last long only if you stick to routine maintenance. Here are some tips to help you:
- Regular Inspections: Look over the fence on a regular basis for any wear and tear. Immediately take care of any issues before they worsen.
- Cleaning: Occasionally clean the fence to remove dirt, debris and other residues that may be harmful to its longevity and appearance.
- Rust Prevention: If your fence is steel, then treat it or paint it with rust-resistant treatments from time to time for its survival.
- Re-tightening: With the passage of time, screws and bolts become loose. Regularly check and tighten all loose fasteners that hold the fence in its place.
Conclusion: Enjoy Your Delta V-Tech Fence
Congratulations! By following these simple Delta V-Tech Fence Installation Instructions, you have installed a sturdy, long-lasting, and safe Delta V-Tech fence that contributes to the safety and beauty of your property.
Regular maintenance and checks will assure you that your fence will serve in as good condition as possible for many years.
FAQ’s on the Delta V-Tech Fence Installation Instructions
a.) What tools do I need to install a Delta V-Tech fence?
You’ll need a posthole digger, level, power drill, screws, and concrete or gravel.
b.) How deep should Delta V-Tech fence posts be?
Fence posts should be dug at least 2-3 feet deep for stability.
c.) Do I need a permit to install a Delta V-Tech fence?
Yes, check your local building codes for any permit requirements.
d.) How far apart should Delta V-Tech fence posts be?
Posts should be spaced 6–8 feet apart, depending on the fence design.
e.) Can I install a Delta V-Tech fence on uneven ground?
Yes, but you may need to adjust the post heights to follow the ground’s slope.
f.) How long does it take for concrete to set for fence posts?
Concrete typically takes 24-48 hours to fully cure before installing the panels.
g.) What is the best way to maintain a Delta V-Tech fence?
Regular cleaning, checking for rust, and tightening loose screws ensure longevity.